Posts

Ergonomic Chair Setup

Comfortable desk work begins with proper chair setup. Follow these helpful tips to ensure a proper ergonomic chair setup.

Chair Setup

  • Push your hips as far back as they can go in the chair.
  • Adjust the seat height so your feet are flat on the floor and your knees are equal to, or slightly lower than, your hips.
  • Sometimes the desk height forces you to have the chair higher than you what will allow you to touch the ground.  If your feet don’t reach the ground put a small box under your desk to rest your feet on.
  • The back of the chair should be at a 100°-110° reclined angle which should create an angle between your body and your thighs of 90° -100°.

    Step 1 Chair.

    From UCLA Ergonomics

  • Make sure your upper and lower back are supported. Use extra cushions at the small of your back if your chair does not have adequate support.
  • Adjust the armrests so that your shoulders are down and relaxed.
  • If your armrests prevent your shoulders from being in a relaxed position, remove them.
  • Keep your body straight with the head and neck upright and looking forward, not to the side. Do not hunch over or slouch.

OTHER TIPS

  • Don’t cross your legs while sitting. This can cut off circulation and/or lead to hip problems.
  • Make sure your chair seat has a soft, downward curved edge so that it does not dig into the back of your thighs. This can also cut off circulation.
  • When purchasing a chair the best feature is its ability to adjust each component separately.
  • If sitting is too painful, consider a standing workstation.


Next post “Ergonomic Keyboard and Mouse Setup”

Best Chiropractor in Mission Valley


Congratulations to Dr. Rose, DC on being voted 2012 Best Chiropractor in Mission Valley by Mission Valley News.

Click Here for the entire release.

Mission Valley News offers community news and information on Mission Valley, Old Town, Linda Vista and surrounding areas.

Sciatic Nerve Glide

Piriformis Syndrome Part III- Treatment

Piriformis Syndrome Treatment

The two main goals of treatment are 1) to relief irritation to the sciatic nerve and 2) address any functional problems that may be contributing.
If the sciatic nerve is inflamed the first step is to decrease aggravation from compression. Things to avoid are leg crossing, sitting on your wallet, and sitting on hard surfaces.  Things you should begin doing are applying ice to the piriformis, stretching of the piriformi, and taking oral anti-inflammatories (as directed).  Stretching every 2-3 hours (while awake) is a key to the success of non-operative treatment. Prolonged stretching of the piriformis muscle is accomplished in while lying on your back with the hip flexed and passively adducted/internally rotated (see picture).  Another exercise that can be helpful to decrease irritation between the piriformis and sciatic nerve is a nerve gliding exercise.  This exercise tensions the sciatic nerve and allows it to move relative to the piriformis. It is sometimes called nerve flossing to better describe how the nerve moves through other structures.  Two types of nerve gliding exercises are pictured below. (Pictures from http://www.dynamicchiropractic.com/mpacms/dc/article.php?id=53203)
 Sciatic Nerve GlideSciatic Nerve Tensioner
Manual therapy can be extremely helpful in releasing tension on the sciatic nerve and addressing functional deficits.  Soft tissue therapies, including myofascial release and Graston®, aimed at releasing tension and muscular adhesions within the piriformis can be beneficial.  Chiropractic spinal adjustments can help address functional contributions from the spine such as sacroiliac joint hypomobility and low back dysfunction.  Hyperpronation of the foot can be addressed through orthotics in the short term and foot strengthening in the long term.  Pronation is a normal foot motion however overpronation may lead to increased external rotation of the hip with walking putting tension on the piriformis and sciatic nerve.
Treatment may take several months of consistent work and it is important not to get discouraged. As long as there is no progression of neurological symptoms conservative treatment is the best option. Your symptoms should be monitored by a healthcare practitioner to ensure there is no progression.
-Dr. Kevin Rose, DC
Q Angle

Piriformis Syndrome Part II- Evaluation

Clinical Diagnosis

Piriformis syndrome occurs most frequently between ages 40-60 and is more common in women than men.  Some reports suggest a 6:1 female-to-male ratio for piriformis syndrome; , possibly because of biomechanics associated with the wider quadriceps femoris muscle angle (ie, “Q angle”) in the pelvis of women. Reported incidence rates for piriformis syndrome among patients with low back pain vary widely, from 5% to 36%.

Q-Angle

The most common  symptom of patients with piriformis syndrome is increasing pain after sitting for longer than 15 to 20 minutes. Many patients complain of pain over the piriformis muscle (ie, in the buttocks), especially over the muscle’s attachments at the sacrum and medial greater trochanter. Symptoms, which may be of sudden or gradual onset, are usually associated with spasm of the piriformis muscle or compression of the sciatic nerve; these symptoms include radiating/shooting pain or tingling or numbness in the back of the thigh, leg, or foot.  These symptoms must be evaluated by a healthcare provider to differentiate the possible causes.  Patients may also complain of difficulty walking and of pain with internal rotation of the involved leg, such as occurs during cross-legged sitting or walking. X-rays or an MRI offer little help in directly diagnosing piriformis syndrome but may be used to rule out other causes of sciatica such as a herniated disc in the lumbar spine.

Functional Evaluation

There are many functional abnormalities that may have either caused or resulted from this condition.  Once the diagnosis has been made, these underlying, perpetuating biomechanical factors must be addressed.

Functional biomechanical deficits associated with piriformis syndrome may include the following:

  • Tight hip external rotators including pirifromis
  • Tight adductors (groin)
  • Hip abductor weakness
  • Lower lumbar spine dysfunction
  • Sacroiliac joint hypomobility
  • Hyperpronation of the foot and prolonged toe-off

Functional adaptations to these deficits include the following:

  • Ambulation with the thigh in external rotation
  • Functional limb length shortening
  • Shortened stride length

Next post will discuss treatment options for piriformis syndrome

Piriformis Syndrome

Piriformis Syndrome: Overview and Causes

Piriformis SyndromePiriformis syndrome is a unique cause if sciatic nerve irritation (neuritis) or sciatica. The condition, which can mimic lumbar disc herniation, usually is caused by irritation of the sciatic nerve due to spasm and/or contracture of the piriformis muscle. Piriformis syndrome is also referred to as “pseudosciatica”, “wallet sciatica”, and “hip socket neuropathy”.
It frequently goes unrecognized or is misdiagnosed in clinical settings. Piriformis syndrome can “masquerade” as other common somatic dysfunctions, such as intervertebral discitis, lumbar radiculopathy, primary sacral dysfunction, sacroiliitis, sciatica, and trochanteric bursitis.


(Image from http://www.concordortho.com/patient-education/topic-detail-popup.aspx?topicID=4214fc65d020761633286131e407d037)

Anatomical Considerations

The proper understanding of piriformis syndrome requires knowledge of the anatomy and anatomical variations in the relationships between the sciatic nerve and the piriformis muscle.

The piriformis muscle is flat, pyramid-shaped, and oblique. This muscle originates on the front of the sacrum and inserts at the greater trochanter of the femur. With the hip extended, the piriformis muscle is an external rotator of the hip; however, with the hip flexed, the muscle becomes a hip abductor.

In most of the population, the sciatic nerve exits the pelvis deep along the lower surface of the piriformis muscle. However, many developmental variations of the relationship between the sciatic nerve in the pelvis and piriformis muscle have been observed. In as much as 22% of the population, the sciatic nerve pierces the piriformis muscle, splits the piriformis muscle, or both, predisposing these individuals to irritation of the sciatic nerve.

Sciatic N and Piriformis Orientation


From http://www.anatomyatlases.org/AnatomicVariants/NervousSystem/Images/70.shtml

Causes of Piriformis Syndrome

Piriformis syndrome can be caused by a variety of issues. The underlying mechanism is from irritation to the sciatic nerve. Below are some causes of irritation to the sciatic nerve as it passes the piriformis muscle:

1. Muscular problems

  • Spasms and adhesions in the piriformis muscle cause compression and irritation of the sciatic nerve. Muscular damage or tightness can develop from a single injury or repetitive use injury. Vigorous physical activity can lead to such an injury- (commonly seen in athletes such as runners, cyclists, and dancers).

2. Postural

  • Hyperlordosis (increased curvature of the low back) and increased foot pronation are both risk factors for piriformis syndrome

3. Traumatic

  • Direct compression of the piriformis and/or sciatic nerve from an external soure such as a wallet.

4. Partial or total nerve anatomical abnormalities

  • An anomaly in the nerve itself as it passes through the piriformis muscle can lead to dysfunction

5. Other causes can include the following:

  • Pseudoaneurysms of the inferior gluteal artery adjacent to the piriformis syndrome
  • Bilateral piriformis syndrome due to prolonged sitting during an extended neurosurgical procedure
  • Cerebral Palsy
  • Total hip arthroplasty
  • Myositis ossificans

Stay tuned…… the next post will talk about how this problem is diagnosed and treated.

Lateral Demipointe Compressed - Xray of Ankle

POSTERIOR IMPINGEMENT IN DANCERS

Posterior ankle impingement is a common cause of pain in ballet dancers.   Other names for this condition are “os trigonum syndrome” and “nutcracker syndrome”.  It is called “nutcracker syndrome” not because of its common occurrence in ballet at Christmas-time but because of the way the tissue of the ankle is squeezed at the ankle.  The following is a brief overview of this condition and how it relates to dancers.

Posterior impingement of the ankle is often attributable to the presence of an accessory bone growth called an os trigonum or a Stieda process that is located just behind the talus (see x-ray for anatomy).   The stress from repetitive plantarflexion by dancers, especially at a young age, is the suspected cause of the development of the os trigonum.  Pain in posterior impingement occurs when the soft tissue of the ankle is pinched between the posterior lip of the tibia and the calcaneus.  This occurs when the foot is in extreme plantarflexion such as during releve in the demipointe or en pointe positions.

Diagnosis
Ankle pain ballet San Diego

Proper diagnosis of posterior impingement is imperative for recovery from this injury.  Posterior impingement attributable to an os trigonum is usually misdiagnosed as Achilles’ tendonitis/tendonopathy, peroneal tendonitis or flexor hallucis longus strain.

The two main symptoms of posterior impingement are a decrease in plantarflexion compared with the unaffected ankle and pain in the posterior region of the ankle.  Often dancers are aware of a lack of ability to fully pointe in one foot compared to the other, this may be an early sign of impingement.   Another common description dancer’s use is it feels like pinching in the heel during releve.  Diagnosis is often aided by x-Rays of the ankle.  It is best to request an x-ray to be taken during releve to evaluate the biomechanics of the injury.  If there has been persistent pain for a period of 1– 4 months, local swelling, and radiographic assessment indicating a posterior ankle impingement, then an MRI should be performed.

Treatment for Posterior Impingement of the Ankle

Once posterior impingement is diagnosed focused treatment should begin.  Non-surgical care is usually successful and should be the first line treatment.  Treatment should be focused on taking pressure off of the tissue being pinched.  Exercises should focus on engaging the deep muscles of the leg especially the deep flexors.  One exercise that is helpful and can be done at home is a self traction maneuver with plantarflexion (see picture).  The patient holds his or her ankle, as shown, with downward pressure and performs the motion with a bent knee.  Bending the knee helps disengage the gastrocnemius muscle and soleus forcing the deep flexors to engage. Post Impingement Exercise Compressed Another great exercise is ankle range of motion with traction applied by a therapist using very strong elastic bands.  Dancers may experience relief with traction and feel they are able to fully plantarflex; this can also be a good way to support the diagnosis as Achilles’ tendonitis is often unchanged with traction.  Manipulation of the ankle especially the talus can provide relief as well. Conservative therapy is successful in the majority of cases. Recovery may take several months.

A surgical approach should only be adopted in the following cases:

  • recurrent or unremitting symptoms in professional ballet dancers;
  • persistent decreased plantarflexion compared with the unaffected ankle;
  • failure of physical and medical therapies after 1– 4 months (depending on the level of the athlete/dancer);
  • posterior impingement clinically suspected and indicated by both x-ray and MRI.

Ankle pain and heel pain is a common symptom in dancers and posterior impingement is only one of the causes. If you think you may be suffering from posterior impingement seek advice from a qualified healthcare professional with expertise in dance injury.

-Dr. Rose, DC, CCSP®

Dr. Rose is a Certified Chiropractic Sports Practitioner® with experience in dance medicine.  He is currently Director of Physical Rehabilitation at Ballet San Jose and a member of the International Association of Dance Medicine and Science.

REFERENCES

Albisetti W, Ometti M, Pascale V, De Bartolomeo O: Clinical evaluation and treatment of posterior impingement in dancers. Am J Phys Med Rehabil 2009;88:349–354.

Niek van Dijk C: Anterior and posterior ankle impingement. Foot Ankle Clin 2006;11:663– 83

F Cilli, M Akcaoglu: The incidence of accessory bones of the foot and their clinical significance. Acta Orthop Traumatol Turc 2005;39:243– 6

Glabrum - Picture of Shoulder

Labral tears of the shoulder: surgery or not?


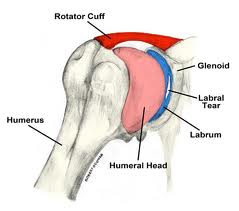
At the recent American Orthopaedic Society for Sports Medicine, a comparison of non-surgical treatment and surgical treatment for SLAP labral tears of the shoulder in baseball players was presented. The labrum is a cartilage structure that makes the Glabrum - Labral Shoulder Tearsocket of the shoulder deeper and helps hold the upper arm. SLAP tears are a specific type of labral injury that is mainly caused by repetitive throwing.   Although surgical repair of SLAP tears is common, little is known about the effectiveness of nonsurgical pain relief and the effects of surgery on performance.

Return to play

Return to same level of play

Surgery

48%

7%

Non-Surgery

40%

22%


The return to play rate in SLAP injuries is low, typically reported at less than 50%. In this study the return to play rate for those that underwent surgery was 48% while those that underwent rehabilitation was only slightly lower at 40%. The most interesting finding in this study however was that the group that had surgery rarely, only 7% of the time, returned to the level of play that they had previously attained. The non-surgery group in comparison returned to the same level of play 22% of the time.

John E. Kuhn, MD, associate professor of orthopedic surgery and rehabilitation and chief of shoulder surgery at Vanderbilt University Medical Center in Nashville, Tennessee described the findings as “very significant” and summed up the findings:

“A lot of these throwing athletes can be treated non-operatively,” Dr. Kuhn said. “They had very good success with rehabilitation.  That suggests that patients can throw with SLAP tears, and that not every SLAP tear needs to be repaired,” he said. “Many can be rehabilitated; the sources of pain or disability may not even be the SLAP lesion itself,” he added. The research suggests that surgery in this patient population really should be a career-salvaging option, he explained. “It really shouldn’t be something you throw at somebody quickly or early. Rehab them, do everything you can to prevent surgery,” he concluded.

Another take home message from these findings that should be discussed further is the importance of avoiding shoulder injuries from throwing.  As stated the percentage of those injured with SLAP tears that return to play is less than 50%.  The best advice then logically is to avoid getting a SLAP tear altogether.  Unfortunately, there is no sure fire way to avoid getting a tear if you are a pitcher. However what can be done is limiting the risk factors for injury.  Risk factors for throwing injuries include a decrease in shoulder internal rotation, poor scapular control, and high pitching load.  These risk factors should be screened for and proper preventative exercises should be built into any strength and conditioning program for baseball players, especially pitchers. Non surgical treatment in these cases included rehabilitation that focused on stretching the posterior capsule of the shoulder to increase internal rotation and training the scapular muscles to hold the scapula in a stable position during the wind-up and cocking phase of the throwing motion. These exercises should also be at the core of any preventative arm care program for baseball players. Manual therapy, including myofascial release and Graston treatment can also be beneficial to aid in increasing range of motion.  These preventative strategies should be overseen by a healthcare provider knowledgeable in baseball injuries.

If you would like more information about how to recover from or prevent shoulder injuries contact our office today.

Another article outlining preventative exercises is coming soon…

-Dr. Kevin Rose, DC


 References

Yin, S.”SLAP Tears Often Treated Successfully without Surgery”. Medscape Medical News, July 7 2012.

Wilk et al. Passive range of motion characteristics in the overhead baseball pitcher and their implications for rehabilitation.  Clin Orthop Relat Res. 2012 Jun;470(6):1586-94.

Wilk et al. Shoulder injuries in te overhead athlete.  J Orthop Sports Phys Ther. 2009 Feb;39(2):38-54.


Ankle Kinesio Tape

Kinesiology Tape for Dancers

Many dance medicine specialists and dancers have begun to use Kinesiotape as a staple to manage their injuries.  Developed Ankle Kinesio Tapemore than 25 years ago in Japan by chiropractor Dr. Kenzo Kase, the Kinesiotape method drew worldwide interest when the U.S. Olympic volleyball player Kerri Walsh wore the tape to support her shoulder during the 2008 Games in Beijing. Now many elite athletes, including dancers use Kinesiotape.  Unlike traditional athletic tape, the latex-free Kinesio stretches easily, and permits greater range of motion, making it popular with dancers. It allows the dancer to perform while still protecting them from further injury. “The old way of taping was stiff and tried to support ligaments, but we have learned it gave less support than we suspected,” says Dr. Rebecca Clearman, M.D, “Kinesiotape, on the other hand, helps dancers self-correct. (For instance) if a dancer is hyper-extending, it can serve as a reminder at the end of the range to not go as far.”

Kinesiotape can be used to stimulate or relax a muscle, depending on the direction of the recoil of the stretched tap. Whether relaxing or activating, the tape gets placed along the line of the muscle. For activating, the direction of the tape goes from muscle origin to insertion. The tape’s degree of stretch determines the strength of the recoil action, so each application can be tailored to a dancer’s needs.

It’s like a brace, but better, because of it allows greater range of motion and also provides proprioceptive input (joint balance). Kinesiotape comes in a variety of brands and can be purchased by the consumer, however initially the tape should be applied by a dance medicine professional with knowledge of dance mechanics.  After several sessions the injured dancer can learn to put the tape on properly by himself/herself.

Kinesiotape is not a magic bullet. Proper diagnosis of the injury by a qualified healthcare professional is always the first step and during recovery, proper rehabilitation and correction of biomechanical errors are keys.

-Dr. Rose is a San Diego Chiropractor and a Certified Chiropractic Sports Practitioner®.  He is a member of the International Association of Dance Medicine and Sciences and has experience with ballet dancers from youth to professional.

Preventing Throwing Injuries in Youth Baseball

 More and more young baseball players, especially pitchers, are coming down with “Little League elbow,” or “Little League shoulder.” Don’t let the names fool you; these are real medical diagnoses with real consequences.  Among pitchers under 12-years-old, as many as 45 percent complain of chronic elbow pain, according to several published studies. At the high school level, nearly six in every 10 pitchers suffer chronic elbow pain.  Most will heal with a combination of rehabilitation and prolonged rest while some will require surgery.

How to prevent throwing injuries

Limit the number of pitches

A broad recommendation is that pitchers base their number of pitches each week by multiplying their age by 10, so an 8-year-old would limit his pitches to 80 per week. A 12-year-old would throw no more than 120.

The American Academy of Orthopaedic Surgeons (AAOS) recommends limiting the number of pitches per game to 60 to 100, with no more than 30 to 40 in a single practice session, adding that innings pitched should be limited to about four per week, with a minimum of three days rest between starts.

Warm Up

Research studies have shown that cold muscles are more prone to injury.  The AAOS suggests an active full body warm up followed by slow, gentle stretching, holding each stretch for 30 seconds.  A knowledgeable coach or trainer should be able to guide your athlete in this area.

Throw Correctly and Master the Basics

Poor throwing motions put undue stress on the elbow and shoulder.  It is especially important that between the ages of 8 and 14 players receive skilled instruction in proper throwing mechanics.  Pitching lessons should focus on gaining control, increasing velocity and developing a command of the strike zone.

Recognize the warning signs

One of the most important factors to preventing the development of serious injuries is early identification and treatment. Young players often ignore pain or are encouraged to play through it.  This way of thinking can be extremely harmful and lead to more serious complications that may not heal without aggressive treatment and possible surgery.  However, if caught early, most youth throwing injuries can be relieved with a combination of therapy, rest, and rehabilitative exercises.

Early signs of injury include decrease in ability to throw the ball as fast or as accurately, loss of enjoyment in playing baseball, elbow or shoulder pain with or after throwing.   If any of these signs are present, the player should be evaluated by a healthcare professional.  More significant signs include prolonged persistent pain after throwing, swelling at the elbow, and difficulty straightening the elbow.

Any persistent pain, loss of motion or joint should keep a player on the sidelines until the symptoms disappear or a doctor clears the players. Be sure to consult a health care professional familiar with the intricacies of baseball injuries if any of these signs are present.

-Dr. Kevin Rose, DC, CCSP®


Dr. Rose is a Certified Chiropractic Sports Practitioner® located in San Diego.  As a former professional baseball player, having played three seasons in the minor leagues, Dr. Rose understands the unique characteristics of baseball injuries first hand. 


Stretching Aerobics

Preventing Dance Injuries

The Dancer in Action
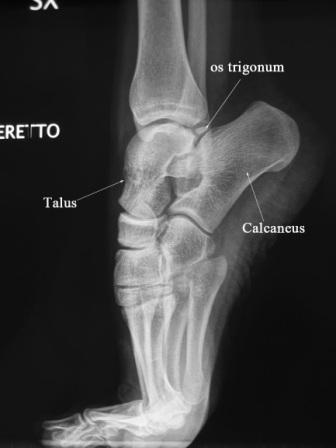
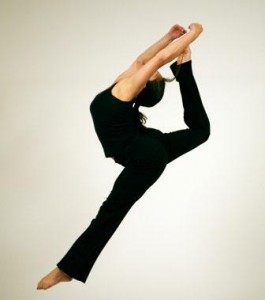
physical demands placed on the bodies of dancers have been shown to make them just as susceptible to injury as football players.  For this reason, more emphasis should be placed on creating awareness of risk and preventing injuries in dancers.  Most dancers begin dancing at a young age, the repetitive practice of movements that require extreme flexibility, strength, and endurance make them prime candidates for overuse injuries.  In fact, there is little doubt that the vast majority of injuries are the result of overuse rather than trauma. These injuries tend to occur at the foot, ankle, lower leg, low back, and hip. These injuries show up with greater frequency in dancers as they age, so it is extremely important to emphasize what the young dancer can do to prevent future injuries.


WHAT CAUSES DANCE INJURIES?

Dancers are exposed to a wide range of risk factors for injury. The most common issues that cause dance injuries include:

  • Type of dance and frequency of classes, rehearsals, and performances
  • Duration of training
  • Environmental conditions such as hard floors and cold studio
  • Equipment used, especially shoes
  • Individual dancer’s body alignment
  • Prior history of injury
  • Nutritional deficiencies

How to Prevent Dance Injuries

Getting and keeping dancers free of injury in a fun environment is key to helping them enjoy a lifetime of physical activity and dance. With a few simple steps, and some teamwork among parents, teachers and health professionals, dancers can keep on their toes and in the studio with a healthy body.

Key Points

Dancers should remember a few key things to prevent injury:

  • Wear properly fitting clothing and shoes
  • Drink plenty of fluids
  • Resist the temptation to dance through pain
  • Pay close attention to correct technique
  • Be mindful of the limits of your body and do not push too fast too soon
  • Perform proper warm-up and cool-down

Parental Oversight

Parents play a large role in injury prevention. First, they must be careful not to encourage their children to advance to higher levels of training at an unsafe rate. Specific to ballet, parents should ensure that the decision to begin pointe training is not made before the child’s feet and ankles develop enough strength. Age 12 is the generally accepted lower limit, but strength and maturity are more important than age.

Proper Instruction

The first line-of-defense to prevent injuries may be dance instructors. From the onset of instruction teachers should establish a class environment where students are not afraid to share that they are injured and need a break. Students should also be consistently instructed on the importance of warm-ups and cool-downs, proper equipment, and at what point, whether by age or maturity, it is appropriate to move on to the next level of dance.

Health Care and Screening

Health professionals play a significant role not only in treating and rehabilitating the injuries dancers incur, but also in preventing them. Dancers respond well to providers who respect both the aesthetics and intensity of dance. Experienced providers can initiate and facilitate screening sessions for dancers to help identify potential problems and prevent future injuries. They should be considered a natural part of a dancer’s career and sources of insight into staying healthy. A dancer should return after an injury only when clearance is granted by a health care professional.

REFERENCES

Clippinger, K. Dance Anatomy and Kinesiology. Champaign, IL: Human Kinetics, 2007.

Howse, J. Dance Technique and Injury Prevention. 3rd ed. London: A & C Black, 2000.

Solomon, R, J. Solomon, and SC Minton. Preventing Dance Injuries. 2nd ed. Champaign, IL: Human Kinetics, 2005.

www.stopsportinjuries.org