Partner Towel Traction for the neck

Towel Traction with Partner: A Guide to Relieve Neck Pain

Introduction

Neck pain is a common discomfort that can be caused by various factors such as repetitive postural strain, muscle tension, or injuries. One effective method to alleviate neck pain is through towel traction, a simple and gentle technique that can be done with the help of a partner. If you do not have a partner readily available, check out our post on the neck hammock which is a device that does not require help. In this blog, we will provide a step-by-step guide on how to use partner towel traction to relieve neck pain. Also check out our YouTube video below which shows a quick demonstration on how to perform towel traction for neck pain.

https://www.youtube.com/watch?v=oDkWwAQOeas

Step 1: Gather the necessary equipment for towel traction

To perform partner towel traction for neck pain, you will need a few basic items:

Towel: Choose a towel that is long enough to cover the back of your neck comfortably; we usually use a hand towel size or similar.

Partner: Find a willing partner who can assist you in performing the traction. 

Comfortable surface: Choose a flat, supporting surface. We find a bed with your head as close to the edge as possible works well for both your comfort and the comfort of your partner.

Step 2: Lie down in a comfortable position

Lie down on the comfortable surface with your neck supported and whole body relaxed.

Step 3: Fold the towel

Towel Traction for neck pain

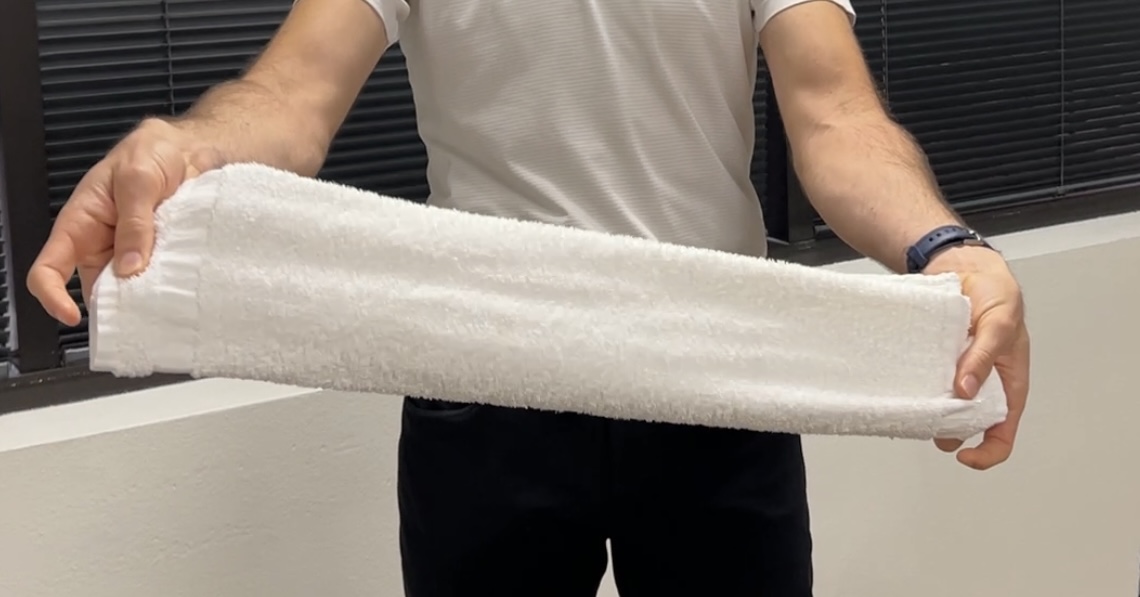
Fold the towel lengthwise into a long strip that is wide enough to comfortably fit around the back of your neck.

Step 4: Place the towel around your neck

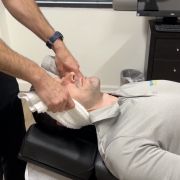
Have your partner gently place the folded towel around the back of your neck, making sure it is centered and positioned at the base of your skull.

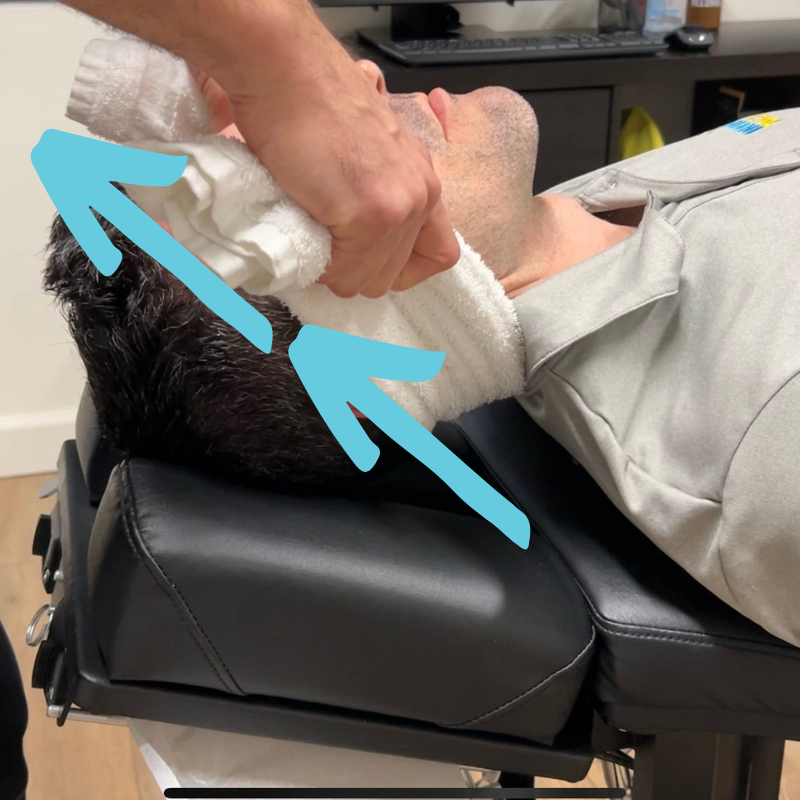
Step 5: Partner gently pulls on the towel

Instruct your partner to hold the ends of the towel and gently pull the towel first up into the base of the skull (without lifting the head) then apply a gentle traction force. The traction force should be firm enough to create a stretch in your neck muscles, but not too intense to cause pain or discomfort. You should feel a gentle stretch in the muscles at the back of your neck. If you get pain in the neck or pain, tingling or numbness that radiates STOP.

Towel traction for neck pain

Step 6: Hold for 10 seconds

Hold the traction for 10 seconds, allowing your neck muscles to relax and stretch. Breathe deeply and try to fully relax your neck and shoulders during this time.

Step 7: Release the towel traction

Instruct your partner to release the traction slowly and gently. A common pitfall is that the partner will release the stretch too quickly which can cause pain. Take your time and release slowly!

Step 8: Repeat step #5-7 at least 10 times

Step 9: Rest and relax

Take a few deep breaths and rest for a few minutes after the traction. Gently move your neck from side to side or do some gentle neck stretches to further promote relaxation.

This can be performed 1-2 times per day as needed. 

Partner towel traction can be a simple and effective technique to relieve neck pain and promote neck relaxation. Perform this technique with a willing partner who can apply gentle traction as tolerated. Communication is important during the entire process. It is recommended to consult with a healthcare professional before attempting partner towel traction. With proper guidance and practice, partner towel traction can be a valuable tool in self management of neck pain.

Home Treatment fr Plantar Fasciitis

Home Treatment for Plantar Fasciitis

Plantar Fasciitis can be a frustrating condition to deal with for both the patient and the practitioner. While challenging, we have seen excellent results in resolving plantar fasciitis at our San Diego sports injury clinic. The combination of Graston/Active Release Technique combined with specific home treatment for plantar fasciitis work well to eliminate it for good! Keep reading for our home treatment for plantar fasciitis strategies and check our our Youtube video.

4 Phase Home Treatment for Plantar Fasciitis

  1. Stretch and Mobilize– Foam rolling, lacrosse ball massage, and specific stretches are primarily used in this treatment phase. The goal is to alleviate tension that may be causing pain, faulty biomechanics, and other compensations.
  2. Plantar Fasciitis Specific Strengthening– Foot exercises are used to help strengthen the intrinsic muscles of the foot to help support the arch, foot, and ankle. Eccentric lower leg exercises are prescribed to help stretch and strengthen the surrounding tissue. Research has shown that eccentric loading exercises for plantar fasciitis has significant benefit.
  3. Global Strengthening- As symptoms improve, it is important to work on strength and balance moving up the lower extremity. Typically this involves core, hip, posterior chain strengthening to support the entire leg.
  4. Sport Specific Strategies- Depending on the sport or activity, sport specific strategies are necessary for successful “return to play”. For example, as a runner, you will want to build endurance in the tissues before returning to quick explosive speed work.

Managing Symptoms During the 4 Phase Approach

There are many different devices, that can help minimize symptoms while performing home treatment for plantar fasciitis. In our article 7 Ways to Treat Plantar Fasciitis at Home, we discuss these strategies in detail. In summary, stretching and supportive devices can minimize the painful symptoms. The more normal you can move around your heel, the less strain your body will experience.

Introduction to Home Treatment for Plantar Fasciitis

Watch our Youtube video describing our strategies mentioned above. Don’t forget to subscribe to our channel! We

Follow along with our next blog post, Stretch and Mobilize Plantar Fasciitis, for the specific exercises we use with our patients to eliminate plantar fasciitis!

Are you looking for a provider to help with your heel pain? Peak Form Health Center has the sport doctors that can help! We are conveniently located in Mission Valley, San Diego near the neighborhoods of UTC, La Jolla, Normal Heights, Hill Crest, Mission Hills, and Kensington.

Treat Tennis Elbow at Home

Top Tips to Treat Tennis Elbow at Home

Some of the links in this post are affiliate links. We may earn an affiliate commission if you click on a link and purchase an item we recommend. This doesn’t add any additional cost to you, but helps support our business.

When you treat tennis elbow at home it will often help significantly reduce the amount of time this painful condition persists. At home, using a combination of pain relieving gels, taping/strapping, myofascial release, and specific exercises, tennis elbow will improve.

Lateral epicondylitis, or more commonly “Tennis Elbow”, is a painful tendinopathy that affects the outer elbow. It is considered an over-use injury to the extensor muscles of the forearm. The extensor muscles of the forearm connect into a common tendon which inserts into the bony part of the outer elbow. With excessive use the muscles tighten and pull at the outer elbow. Pain can be sharp, achy, and fairly constant.

*The following tips are general recommendations. We highly recommend seeking the advice of a qualified healthcare provider to provide a diagnosis and proper treatment plan.

Common Causes of Tennis Elbow are as follows:

  • Playing tennis
  • Excessive computer use (typing)
  • Rock Climbing
  • Repetitive wrenching (mechanics, plumbers)
  • Jiu Jitsu
  • Excessive weight training

Tips to Treat Tennis Elbow at Home

  1. Armaid Foam Massage Tool – The Armaid is a self myofascial release tool designed to break down tight muscles of the forearm. It comes with a number of different attachments to isolate myofascial adhesions (scar tissue) and break them down. With consistent use, the muscles will begin to regain their normal flexibility which will relieve pressure from the painful elbow insertion. This device, in our opinion, is one of the best devices you can use for treating tennis elbow at home. It is especially useful if you participate in a job/sport that causes a lot of strain into the forearm muscles.
    This device is excellent not only for treating tennis elbow at home but for treating “Golfer’s Elbow” which affects the opposite side of the elbow. Watch Dr. Rose demonstrate how to use the Armaid in our video below.
  2. TheraBand FlexBar, Tennis Elbow Therapy – The FlexBar is a flexible bar with grip ridges that allows the bar to twist. The exercise performed is an eccentric load to the extensor muscle group of the forearm. Eccentric loading has been shown in research to strengthen damaged tendons and stretch the muscle fibers. The FlexBar accomplishes this by having the patient grab the bar with the wrist down, and twist the bar up so the wrist is now up. Slowly release to perform the eccentric contraction. Watch Dr. Rose demonstrate this treatment for tennis elbow at home. It can be a little confusing when you start!
  3. RockTape– RockTape is a brand of kinesiology tape. It is designed to support muscle strains, joint sprains, and proper movement mechancis. To treat Tennis Elbow at home, it helps by supporting the extensor muscle group, and the cross strap before the elbow, helps absorb forces from traveling to the painful point on the elbow.
    Treat Tennis Elbow at home
    We prefer rock tape for one simple reason, it just seems to stick better than other brands. It can also be used in conjunction with RockTape’s Rock Sauce Hot and RockSauce Ice, depend if you prefer hot or cold sensations. You put RockSauce on first to which helps remove oils from the skin and you get the benefit of pain relieving effects of hot or cold sensations. You can then apply the Rocktape to the same area.
  4. Biofreeze Pain Relief Gel– Another option to RockSauce. We recommend Biofreeze Pain Relief Gel as it is one of the stronger topical pain relieving gels you can get. It is a product we use daily in our office and can be great for treating tennis elbow at home. Just apply a dime sized portion all around the elbow to help with pain.
  5. Simien Tennis Elbow Brace– A Tennis Elbow Brace can work well for in a couple different scenarios. First, when Tennis Elbow is affecting day to day activities such as opening doors, cooking, shaking hands. Second, when you still need to train or compete at a high level for a competition. The brace works by compressing the tendon right before the insertion point which is the most painful. When forces travel up the forearm, they get dispersed at the site of the brace, minimizing the amount of force that travels all the way to the painful point. Ideally, we want to treat and work tennis elbow to get rid of the symptoms, but this works well to treat tennis elbow at home when dealing with pain.
  6. Muscle Floss AKA Voodoo Floss– Muscle Flossing is a relatively new treatment method for various conditions. It can be a great too to treat Tennis Elbow at home. Muscle flossing works through ischemic compression with rapid blood release into the injured area.
    To explain further, you tightly wrap the elastic band around the elbow. You want to the band to be pretty tight to where it is mildly challenging to bend the elbow. For 30-60 seconds, bend then elbow back and forth, and move the wrist up and down. The band restricts blood flow to the area and movement pumps blood out of the area. You then rapidly release the band which releases rapid blood flow to the area.
    The idea is, this rapid injection of blood to the injured area will help increase the healing process to the tissue. In the pictures below, you can see the elbow is red due to blood flow after 30 seconds of elbow motion.
    treat tennis elbow at home
    treat tennis elbow at home

Those were the top tips we give to patients to help treat tennis elbow at home. We recommend these tips with in person treatment to help fix tennis elbow effectively and quickly. Countless cases of tennis elbow have been treated in our Mission Valley, San Diego office. We primarily use Active Release Techinque, Graston Technique, exercises and a combination of the above tips to treat tennis elbow at our office. Our office is near the neighborhoods of Pacific Beach, UTC, La Jolla, Clairemont Mesa, Santee, La Mesa, Kensington, North Park and South Park.

Treatment for Plantar Fasciitis San Diego

Treatment for Plantar Fasciitis | San Diego

Treatment for Plantar Fasciitis | San Diego

Plantar fasciitis is a frustrating condition that can linger for weeks, months, or even years. It is characterized by pain on the bottom of the heel and even into the arch of the foot. Usually the symptoms are worse when you take your first few steps out of bed. As you move around, symptoms lessen but do not go away. Treatment  is multifactorial, meaning several different approaches usually help fix the issue.

In our sports injury clinic in Mission Valley, San Diego we primarily use Active Release Technique, and Graston Technique treatment for plantar fasciitis. These treatments combined with treatment for plantar fasciitis at home, we see excellent outcomes.

Common Causes of Plantar Fasciitis

There are many causative factors for developing plantar fasciitis. Successful treatment of plantar fasciitis involves discovering the root cause of the injury. Here are the main factors that lead to plantar fasciitis:

  • Standing and walking on hard surfaces for long periods of time
  • Over training, especially with running
  • Excessive forceful jumping or pushing (basketball, football)
  • Ill fitting footwear or shoes without proper support
  • Excessive body weight
  • Congenital foot and lower extremity issues (flat arches, tibial torsion)

    Treatment for Plantar Fasciitis San Diego

 Conservative Treatment in San Diego

At our Mission Valley office, we have treated countless plantar fasciitis cases. Watch the video below to get a full understanding of how we treat plantar fasciitis.

After treatment we work with each and every patient to develop custom exercise programs for patients to perform at home. If a patient is diligent with their home care, patients often see great results.

Check out our blog post Top 7 Ways to Treat Plantar Fasciitis at Home. Usually we recommend a combination of those 7 recommendations to help with continued improvement.

If you have been experiencing heel pain and looking to get it resolved, please do not hesitate to schedule. Our  Sports Chiropractors are trained to properly diagnose plantar fasciitis and other conditions that may be affecting the heel. Our office is conveniently located in Mission Valley near Normal Heights, Pacific Beach, Ocean Beach, and Hillcrest.

Chiropractic Treatment for headaches

Chiropractic Care for Headaches

Chiropractic Care for Headaches | San Diego Chiropractic

Summary

  • Chiropractors are trained to diagnose the type of headache you are experiencing
  • They are trained in manual therapies designed to treat muscles and joints that are causing or worsening the headaches
  • They will work with you to identify reasons to why the muscles and joints are causing headache symptoms
  • If there is a need for a referral, chiropractors can make sure you are sent to the right physician
  • Our chiropractic office for treating headaches is located near La Mesa, Mission Gorge, Kensington, Serra Mesa, Bay Park, and Clairemont Mesa
  • The types of headaches we treat are migraines, tension headaches, cervicogenic headaches, posture related headaches, trigger point referral headaches

Does Chiropractic Care Help Headaches?

Does chiropractic care help headaches? Chiropractic care can help reduce and even fully eliminate headache symptoms. Many headaches are due to muscle imbalances, and/or joint injury to the upper back, neck, and head region.

What Are Common Causes of Headaches?

Headaches are often experienced after trauma to the head and neck. They can also begin the develop over time as a result of poor posture or repetitive strain (same movements during sport, sitting at a desk 40 hours a week). As repetitive stress continues, the muscles and joints become irritated and start referring pain to the head region.

Pain referral patterns of muscles?

Chiropractic Care treats headaches

Upper Trapezius Trigger Point Referral

Acutely or chronically strained muscles can develop trigger points. Trigger points are hyper irritable fibers within a muscle unit that can cause local and referred pain. An active trigger point, actively causes pain. Example: pain in the muscles at the base of the skull with headache symptoms at eyeball area.

In this example, the muscle itself is sore and painful and is referring pain to the eyeball/forehead area. Another example is the upper trapezius muscle which connects the top of the shoulder to the neck. When that muscle develops a trigger point (often due to postural strain), headache symptoms can begin from the neck area up the side of the head, around the ear and to the temples. It looks like a question mark and headache symptoms can be felt anywhere along that path.

Ever tried rubbing your temples to get your headache to go away? Didn’t work? Try addressing the upper trapezius muscle which refers pain to the temples!

Pain Referral Patterns of the Joints

An inflamed and painful joint in the neck may also refer pain to various points of the neck, upper back, and head. Joints are normally injured through whiplash type injuries or quick movements without proper stabilization. Degenerative joints can also be a source of headache symptoms. As the joints wear down from past trauma and age, the degenerative joints compress the local tissues which then can refer pain.

There are plenty of referral patterns that result in headache symptoms. A chiropractor will evaluate the muscles and joints of the neck, shoulder, and upper back to identify the likely culprits. A proper referral will be made if the presenting symptoms are found to be outside of the musculoskeletal system.

Chiropractic Care for Common Headache Symptoms

In our San Diego based chiropractic office, we use a handful of therapies to treat common headache symptoms. Chiropractic adjustments or joint mobilization to the neck and upper back help restore motion to stiff, achy joints and relax local muscle tissues. Active Release Technique, and Graston Technique break down trigger points and tight muscles to eliminate muscular causes of headaches. Home exercises are then given to help combat headache symptoms and decrease the likelihood of the headaches returning.

Here is an example of how we treat a patient with neck and headache symptoms.

Why do the joints and muscles keep causing pain after treatment?

Many chiropractors, physical therapists, and other physical rehabilitation specialists claim they treat the “root cause” of your conditions. Many will treat the muscles and joints that cause the headaches as the “root cause”. Yes, that is treating what is causing the symptoms, but what is causing those muscles and joints to become irritated? Proper chiropractic care for headaches will also look at the entire picture. Here are a few likely causes for recurring headaches:

  • Poor Posture
  • Poor movement mechanics
  • Diet
  • Hydration
  • Stress
  • Sleep

Working working those categories, starting the most likely first, will identify the true cause of the headaches and eliminate them from returning!

Get Your Headaches Treated Today!

Our San Diego chiropractic team is trained to evaluate and treat your headaches. We are confident our chiropractic care for headaches will help reduce and even eliminate the frequency, intensity, and duration of the headaches you are experiencing. We are conveniently located in Mission Valley, San Diego near Ocean Beach, Pacific Beach, Normal Heights, and Hillcrest! Call or schedule online today!

Treat Plantar Fasciitis at home

Top 7 Ways to Treat Plantar Fasciitis at Home

Some of the links in this post are affiliate links. We may earn an affiliate commission if you click on a link and purchase an item we recommend. This doesn’t add any additional cost to you, but helps support our business.

Top 7 Ways to Treat Plantar Fasciitis at Home

Plantar Fasciitis can be a frustrating condition to treat. It can take weeks, months, or even years to fully resolve. Our sports injury clinic in Mission Valley, San Diego specializes in treating chronic injuries, plantar fasciitis included. Check out our other blog post on how we treat plantar fasciitis in our office Plantar Fasciitis: Resolving Foot Pain with Active Release Technique (ART) and Graston. Along with treatment, here are the top 7 ways to treat plantar fasciitis at home.

Trigger Point Release Ball

Using a trigger point release ball and roller to help massage tight muscles of the foot and calf can help ease the symptoms of plantar fasciitis. We recommend the TriggerPoint Foundation Starter Kit  for self massage of the lower legs and feet. It has a durable and firm roller to address the calves and trigger point balls to use on specific points of the calves and bottom of the feet. Using them daily will help improve the quality of the tissues and help treat plantar fasciitis at home.

Calf Stretcher

If you have tight calves, and many of us do, daily stretching of the lower leg will help improve function of the foot and ankle. We recommend a dedicated Calf Stretcher & Foot Rocker  it allows for a really good stretch to the lower leg and foot.  Using it to stretch multiple times throughout the day will help keep the muscles and tendons loose.

YogaToes

Stretching the toes out where the muscles, tendons, and fascia insert can help ease the symptoms of plantar fasciitis. We like YogaToes because they are thick, strong, and durable. Other devices we have found to break easy, or do not offer a good enough stretch in most cases. Where YogaToes when sitting at home, move your toes in a stretched position. They can be very valuable to treat plantar fasciitis at home especially if you have other signs of toe deformity such as bunions.

Heel Cups

One of the ways to ease the symptoms of plantar fasciitis is to stay off of your feet when it hurts. For most people, that is nearly impossible! Tuli’s Heavy Duty Gel Heel Cups are designed to placed in you shoes and absorb shock transmitted to the heel from walking and standing. We also like heel cups as they squeeze your heel together from the sides. This reinforces the heels fat pad to help bolster your natural heel cushion.

Night Splint

Classic plantar Fasciitis symptoms include sharp, dagger like pain in the bottom of the heel. These symptoms are worse during the first steps out of bed in the morning. This is due to the tissues tightening up over night and then getting rapidly/forcefully stretched when you stand up and put weight on the plantar fascia. A Plantar Fasciitis Night Splint helps keep the fascia and lower leg muscles in a stretched position over night to reduce the pain in the morning. It can be highly effective to treat plantar fasciitis at home.

The one complaint we hear from patients is that it is difficult to sleep through the night with it on as it is bulky and awkward. If sleeping is a challenge, then where the brace when you are stationary for extended periods of time to maintain flexibility to the fascia. The next item on the list is a similar device but tends to offer a bit more comfort for sleeping.

Strassburg Sock

The Strassburg Sock is another device to be used when sleeping to help maintain flexibility to the foot and lower leg muscles. One reason we like it better than a splint is that it pulls the toes back to get a better stretch. The two complaints we hear are difficult to sleep with and the sock can compress the calf too much. If sleeping with the sock is too difficult, wear it when you are stationary for long periods of time.

Arch Support

The final recommendation is arch support to help support the plantar fascia. In cases of low arches, extra support to the arch and heel can help ease the symptoms of plantar fasciitis. We recommend Superfeet GREEN Full Length Insole for a couple of reasons. If the goal is arch support, you need something firm enough to actually support the arch. Too many insoles are too soft and do not offer any support whatsoever. Superfeet insoles are made form hard plastic or carbon (depending on models). They support the arch sufficiently. Another reason we prefer Superfeet, is that they have deep heel cups in the insole. This can help bolster the padding around the heel to offer symptom relief.

These are the top 7 ways to treat plantar fasciitis at home. Please keep in mind that these are general recommendations. We always recommend getting a proper evaluation by a health care provider. If you are in San Diego, our injury treatment clinic is conveniently located in Mission Valley. We are located near Hillcrest, Normal Heights, University Heights, North Park, South Park, and Downtown. Our Sports Chiropractors are trained to diagnose, manage, and treat plantar fasciitis. We also offer Acupuncture, Personal Training, and Massage. Please schedule using our online scheduling application or call our office at 619-818-4306 today!

Laptop ergonomics

Laptop Ergonomics | Recommendations

Some of the links in this post are affiliate links. We may earn an affiliate commission if you click on a link and purchase an item we recommend. This doesn’t add any additional cost to you, but helps support our business.

Laptop Ergonomics: General Recommendations

Proper laptop ergonomics is very important for musculoskeletal health. We live a rapidly progressing digital age. More and more jobs are now performed part or full time remotely. Many people find themselves working from a number of different places and therefore primarily use a laptop.  Laptops are versatile and convenient; they also cause a high amount of physical strain on the body. It is very important to practice proper laptop ergonomics.

Laptops do not put a person’s body into a proper position. Due to the attached key board, small screen, and low height, most users find themselves with poor posture through their backs, neck, shoulders, and arms. At 40 to 80 hours per week, this will result in back, neck, shoulder, head, arm and wrist injury sooner or later. This article will discuss helpful recommendations for proper laptop ergonomics.

Laptop Stand

Goal: Raise laptop screen so eye level is in the upper half of screen when sitting/standing with upright posture.

Reason: Reduce Strain to upper back, shoulders, neck and head by promoting proper posture while working.

Equipment Recommendation: Adjustable Laptop Stand
One the most important elements for proper laptop ergonomics is to raise the laptop higher on the work surface. To accomplish this, use a laptop stand. We recommend a laptop stand that is foldable, light, and is adjustable to accommodate sitting and standing posture. The Adjustable Laptop Stand by Rhino Flex is a stand we recommend for patients who work at least part time from home.

We like this laptop stand for many different reasons. First, it is light and portable so it can be used on the go. You can set it up at home, coffee shops, office, you name it. Second, you can set it up to support a seated position and a standing position. For proper laptop ergonomics, having this ability is key to reduce strain to the body throughout the day. Finally, it has an adjustable leg system with measurements so you can quickly set it up and break it down between travel, seated, and standing positions; just remember the numbers!

Keyboard and Mouse

Goal: Keep arms closer to waist level and a slight downward bend at the elbow when screen is elevated.

Reason: Decrease strain to wrist, elbow, and shoulder.

Equipment: Logitech Bluetooth Keyboard and Mouse Combo
Most attached keyboards and mouse pads are again, terrible ergonomically. They often force your arms to work toward mid line and the mousing options (pad, stick, ball) are not as easy to use as a traditional mouse. Using a Bluetooth keyboard and mouse combo via a USB receiver on your laptop is the best way to go.

We recommend the Logitech Bluetooth Keyboard and Mouse Combo particularly when combined with a laptop stand. If you only use a laptop stand, then you will be forced to type like a T-Rex as the keyboard will be in front of your chest! This will eventually create issues with your arms, and posture. The mouse is a nice add on as the laptop mouse pads are not as efficient to use. Finally, having both the keyboard and mouse wireless is nice for on the go type of work and will help with proper positioning for your body.

Standing Mat

Goal: Improve cushioning on standing surface while offering different positions to stand in.

Reason: Decrease forces traveling up body from standing.

Equipment: Standing Desk Anti-Fatigue Mat

The last item that is recommended for proper laptop ergonomics is an anti-fatigue mat. Standing on firm surfaces for extended periods of time can cause discomfort to the main weight bearing joints of the body. We recommend a standing desk anti-fatigue mat to help disperse the forces traveling up the body. This particular mat works well as it also offers several different shapes, angles to stand on to further vary your position throughout the workday.

An important reminder for standing desks, vary your standing and seated position throughout the day! Many people transition to a standing desk and then stand all day long in the same position. Try different foot positions when standing, and work seated periodically throughout the day. Variety is key for proper laptop ergonomics.

Laptop Ergonomics: Conclusion

The combination of the above recommendations along with frequent mini breaks during the workday can help a lot with overall strain to the body. It is important to be aware of these fixes early on in your career to keep your body in the best shape possible. If you are suffering from posture related neck, back, head, and shoulder pain, we are happy to help! Our San Diego Chiropractors are conveniently located in Mission Valley. We are located near Downtown, Point Loma, Hillcrest, North Park, South Park, Golden Hill, and La Mesa. Our clinic also offers acupuncture, massage, and personally training. We believe in a well rounded approach to help a patient take the proper steps to optimal health. Schedule online or call our office at 619-818-4306.

Walking Hip Hike for Running

Walking Hip Hike for Running

Running is essentially a one legged sport when you break it down. One leg touches the ground, supports the body moving forward, and then lifts as the second leg touches down. The walking hip hike drill shown below is great for the following: activate glute stabilizing muscles, improve single leg balance, develop hip/low back control with movement. This is great as a accessory drill for running in general and really good to work on if you suffer from a cross-over gait. Find more information on cross-over gait on our blog: Do you run with a Cross-Over Gait? and Cross over gait Correction.

I recommend performing this drill as a warm up exercise before running. This will activate the stabilizing glute muscles to help build awareness to those muscles during the run. Start by performing 10 steps on each leg before the start of each run. If you are a new runner or trying to fix a cross-over gait, perform this drill daily, with and without runs to develop a stronger mind body connection to those muscle groups.  If you find this drill to be too challenging, try performing other glute activation drill such as a bridge, clam shell, and side lying leg raise.


Weakness to these muscle groups can lead to a number of musculoskeletal issues. Injuries may include low back pain, hip bursitis, IT band syndrome, and shin splints. The hip hike walk will help decrease your chance for developing these injuries or will stop these injuries from reoccurring. Are you already injured? Please schedule with us today to get your running program back on track. We offer the latest treatment methods including: Active Release Technique, Graston technique, Sports Chiropractic, and are certified by The Running Clinic to treat runners and running related injuries!

Runner's Knee Treatment San Diego

5 Pain-Fighting Exercises That Help Your Body Stay Strong

When the body is in pain, the first thing many people think to do is stretch that body part. This may provide temporary comfort, but it is not a long-term solution. In addition to stretching, there are many additional exercises you can do to help relieve pain throughout the body.

Check out some tips for relieving pain in these 5 spots:

Feet Pain

Towel curls are a great foot and toe strengthening exercise. This technique helps build the muscles that support the arch in the foot and is a helpful exercise for anyone experiencing plantar fasciitis.

To do towel curls lay a towel down on the floor in front of a chair. Sit in the chair with your feet flat on top of the towel. Using your toes, pinch the towel and pull it toward you. Try to use all the toes to scrunch up the towel. Release the towel and relax the toes. Repeat this exercise, doing 3 sets of 10 reps with each foot.

Neck Pain

Neck rolls help the spine and neck become strong and flexible. Lots of tension can be held in the shoulders, and that tension tends to lead to headaches or even migraines.

This exercise can be done sitting down or standing up. Begin with good posture and relaxed shoulders. Slowly tilt your head to the left, and then roll it forward across the chest until your head is tilted to the right. Continue to rotate your head around by doing 3 sets of 10 reps.

Knee Pain

Chair squats work all the stabilizer muscles in the legs, especially around the knees. This simple technique will build strong, stable knees.

Stand in front of a chair in the starting position: feet about hip-width apart. With the hands on the hips and the spine in line, bend the knees and slowly lower the body till your glutes touch the chair. Next, slowly come back up, always keeping your weight on your heels. Do 3 sets of 10 reps. To increase the difficulty, use a chair that sits lower.

Hip Pain

Hip bridges will help tighten and tone the hips, glutes, and ab muscles. This is a great exercise, especially if you sit in a chair all day for work. This technique will help activate those muscles after being in a relaxed position all day.

To get into starting position, get down on the floor with your back laid down on the ground. Bend the legs at a 45-degree angle, and keep your hands down by your side. Next, lift the hips up while squeezing the glutes and tightening the abs. When lifting and bringing down the hips, make sure to put pressure on the heels. Doing 2 sets of 10 will do the trick!

Shoulder Pain

Shoulder press exercises incorporate many muscle groups – the deltoids, triceps, and abdominal muscles. This is one of the best ways to help build and protect the shoulders. All you will need is a medicine ball or any heavy household object.

This upper-body exercise is best when standing, so the body can recruit the abdominal muscles. Stand with good posture, feet about hip-width apart, and hold the heavy object at chest height. While tightening the core, keep the back straight, and slowly lift the heavy object above the head until your arms are completely extended. Hold the object for a couple of seconds, and then slowly lower the object back down to chest level. Try 3 sets of 12 reps to start out.

5 Ways to Strengthen Weak Shoulders

5 Ways to Strengthen Weak Shoulders

Ever feel a pop, immediate pain or weakness in your upper body? You may be struggling with weak shoulders. Weak shoulders prevent healthy function of the upper body, not allowing for the muscles to coordinate accordingly at its healthiest condition! This can also occur when different muscle groups including the pectoralis major, rotator cuff, deltoid and other mobility muscles are not working properly! In other cases, it could be that inflammation has occurred from the muscles naturally just protecting themselves from unwanted pain. Shoulder bursitis also causes inflammation in the shoulder blades, which leads to weakening of the shoulders. Here are five effective ways to strengthen weak shoulders:

  1. Strengthening the Rotator Cuff

    The rotator cuff plays a crucial role in the overall function of the shoulder. The rotator cuff includes 4 different muscles including the infraspinatus, supraspinatus, subscapularis and teres minor. These different muscle groups are the central hub for holding together the shoulder joint, as they each have a strong effect on stabilizing the upper arm as it sits in the shoulder joint. There are several different exercises that strengthen the rotator cuff such as exercise band work focusing on rotation.

  2. Focus on Improving Posture

    Poor posture sets people up for shoulder impingement, lower back issues, rotator cuff issues among many other problems. It’s imperative to take posture seriously since simple things like sitting properly at a desk can make a huge difference in preventing weak shoulders. Slouching at the computer instead of sitting up straight with shoulders back should be avoided. There are a few things many can do to fix this issue. Try some exercises that will help correct postural alignment. Self myofascial release using a foam roller or lacrosse ball can be effective to relax muscles that are chronically shortened from poor posture. For more tips on how to improve posture, please talk to your chiropractor.

  3. Scapular Muscle Strengthening/Coordination

    The scapular muscle group consists of 17 muscles that attach to the scapula (or shoulder blade). These muscles play an important function in the mobility, stability, and coordination of the shoulder. In many people these muscles are weak or poorly coordinated which can lead to instability of the shoulder joint. Strengthening the lower scapular muscles (the rhomboids and lower trapezius especially) is an effective strategy to help scapular stability. This can be accomplished by squeezing your shoulder blades together and down toward you tail bone, hold for 5 seconds and then release.

  4. Flexibility

    It may seem counter intuitive to think that weak shoulders need more flexibility or range of motion however this is often the case. For instance many people have habitually tight chest muscles. When the chest is tight it does not allow the rotator cuff to work effectively and stabilize the shoulder. By keeping your chest stretched you can improve the strength of the rotator cuff, which we already know is important for strong shoulders.

  5. Visit a Chiropractor

    Because shoulders involve so many muscles that are highly prone to injuries, visiting a chiropractor to develop a plan to prevent injuries altogether is an extremely smart move. A chiropractor will focus on treating you to provide relief from any past injuries as well as help with preventative measures such as rehabilitative exercises, Active Release Technique and Rocktape. This a fantastic option for those looking to improve current issues with various muscles as well as preventing any previous problems to resurface.