Posts

Walking Hip Hike for Running

Walking Hip Hike for Running

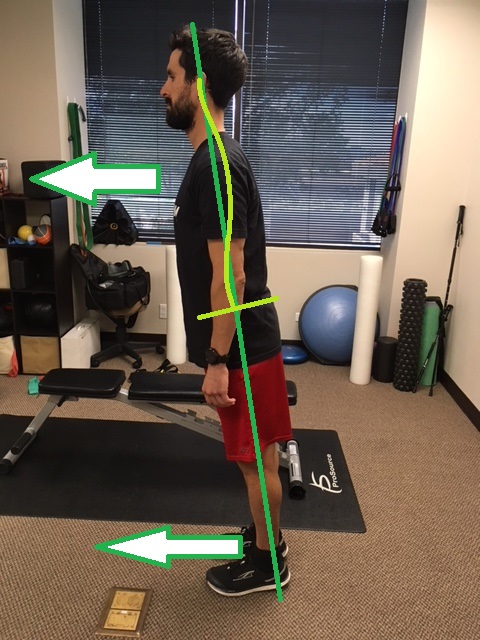
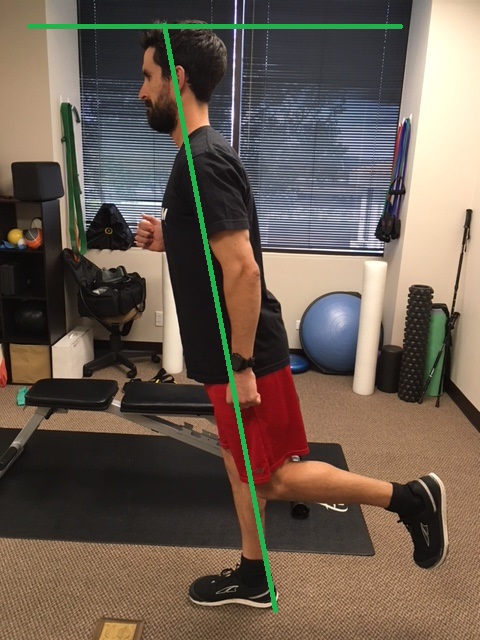
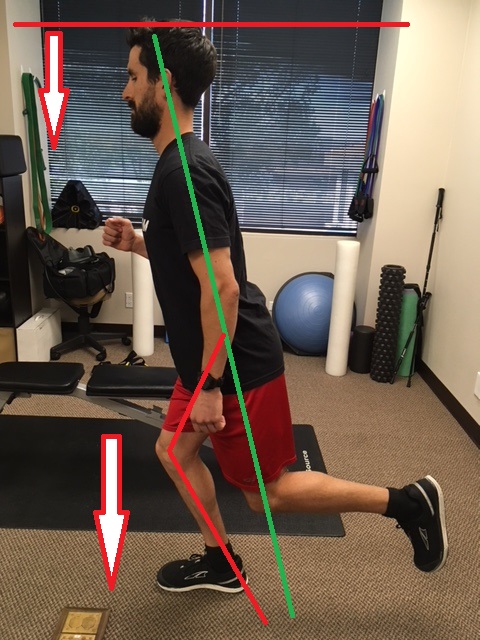
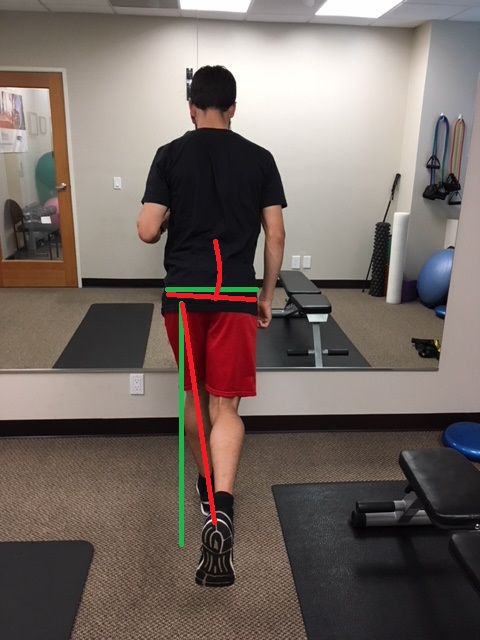
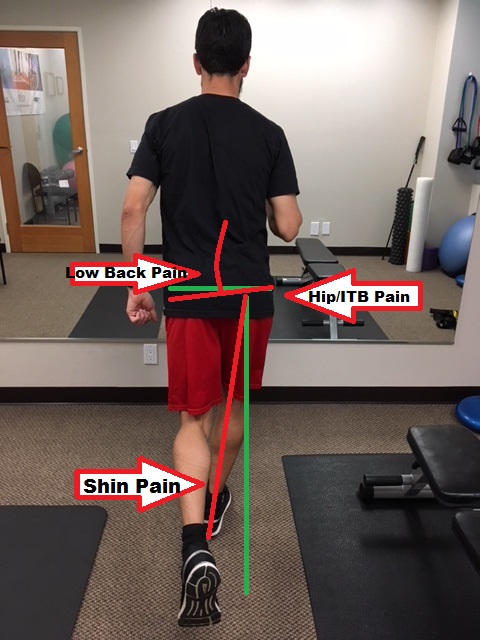
Running is essentially a one legged sport when you break it down. One leg touches the ground, supports the body moving forward, and then lifts as the second leg touches down. The walking hip hike drill shown below is great for the following: activate glute stabilizing muscles, improve single leg balance, develop hip/low back control with movement. This is great as a accessory drill for running in general and really good to work on if you suffer from a cross-over gait. Find more information on cross-over gait on our blog: Do you run with a Cross-Over Gait? and Cross over gait Correction.

I recommend performing this drill as a warm up exercise before running. This will activate the stabilizing glute muscles to help build awareness to those muscles during the run. Start by performing 10 steps on each leg before the start of each run. If you are a new runner or trying to fix a cross-over gait, perform this drill daily, with and without runs to develop a stronger mind body connection to those muscle groups.  If you find this drill to be too challenging, try performing other glute activation drill such as a bridge, clam shell, and side lying leg raise.


Weakness to these muscle groups can lead to a number of musculoskeletal issues. Injuries may include low back pain, hip bursitis, IT band syndrome, and shin splints. The hip hike walk will help decrease your chance for developing these injuries or will stop these injuries from reoccurring. Are you already injured? Please schedule with us today to get your running program back on track. We offer the latest treatment methods including: Active Release Technique, Graston technique, Sports Chiropractic, and are certified by The Running Clinic to treat runners and running related injuries!

IT band syndrome exercises san diego

Cross-Over Gait Correction

Some of the links in this post are affiliate links. We may earn an affiliate commission if you click on a link and purchase an item we recommend. This doesn’t add any additional cost to you, but helps support our business.

How to Fix a Cross-Over Gait

The best way to work on crossover gait is to perform running drills! Many runners are simply unaware that they run with a cross-over gait. Specific running drills to address a this type of gait will significantly improve running efficiency and decrease risk for injury. At our Mission Valley sports injury clinic, we stress the importance of running drills to all of our running patients.

There are three main drills that significantly reduce cross-over gait: increasing cadence, running wider, and activating the hip stabilizers while moving through gait.

  1. Cadence– I talk extensively about cadence in our blog post here. In a nutshell, by increasing running cadence, there is less time for your feet to travel across midline.  Slow cadence allows more time for your feet to creep over midline.
  2. Run wide using a track line– Run around a track with lane lines (or white bicycle lane line). Run so the line is in the middle of your body. The goal is to land with the inner right foot touching the right outer border of the line and vice versa for the left foot. It may feel like you are running VERY wide but with practice it will feel more normal. Practice this drill on the straight away on the track about 4-6 times. Over time you will start to run wider naturally.
  3. Walking hip hikers– The goal is to activate the gluteal muscles, and hold while taking a step. This builds the mind body connection to the hip/core muscles while moving during gait. Watch the video below for a detailed look at the walking hip hiker.

What About Increasing Core Strength?

Core and gluteal strengthening drills alone will not magically get rid of a cross-over gait; again working on correcting the gait will do that. That being said, working on the core and gluteal muscles in conjunction with gait retraining, will support proper running gait. The stronger the supporting muscles are, the more capable they are to resist fatigue during workouts and races. Some runners have no issues with their gait for runs between 3 and 10 miles. Once long runs increase to the 12, 14, 16 mile range, gait issues begin to occur. In this scenario, strengthening workouts to the core and gluteal muscles are paramount to avoid running form breakdown during longer runs. Here are a few of our favorite core and gluteal strengthening exercises:

Gluteal bridge

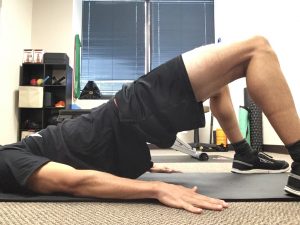
Lay flat on your back, knees bent, and feet flat on the floor just wider than hip width apart. Brace your abdomen to engage the core. Press through your heels to lift the pelvis upward until it is in line with the knees and shoulders. Avoid arching through the back. Add a band around the knees for more gluteal activation. Sets: 3 Reps: 10-20

Bridges improve core and gluteal muscle strength, important for running               Bridges improve core and gluteal muscle strength, important for running

Monster walking 

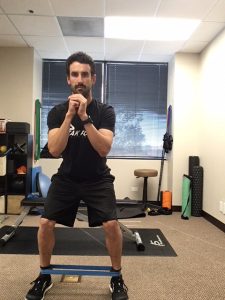
Place a medium resistance mini-loop band around the ankles. Spread feet shoulder width apart and sit into a shallow squat, keeping your core engaged. Step forward and slightly outward with one foot and then repeat with the other. Take 5-10 steps forward and 5-10 steps backward. Continue until you feel a good exercises burn in the muscles of the outer hip. Sets: 3 Reps: Go until it burns

Walking with a band strengthens the gluteus medius muscle to improve hip and low back stability               Walking with a band strengthens the gluteus medius muscle to improve hip and low back stability

Crab walking     

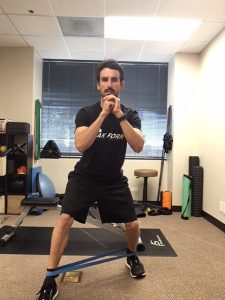
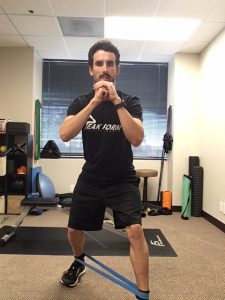
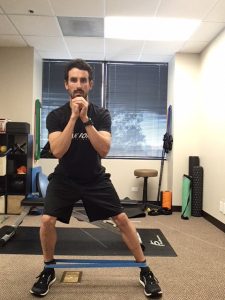
Place a medium resistance mini-loop band around the ankles. Spread feet shoulder width apart and sit into a shallow squat, keeping your core engaged. Take a step to the side, then take the same distance step with the other foot in the same direction; important to not over step inward with the follow up step as this looses tension in the band. Take 5-10 steps one direction and 5-10 steps back in the other direction. Continue until you feel a good exercises burn in the muscles of the outer hip. Sets: 3 Reps: Go until it burns

Walking with a band strengthens the gluteus medius muscle to improve hip and low back stability               Walking with a band strengthens the gluteus medius muscle to improve hip and low back stability

Dead bug

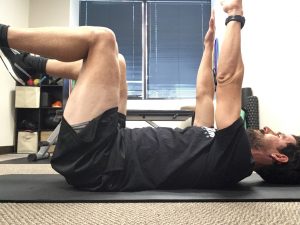
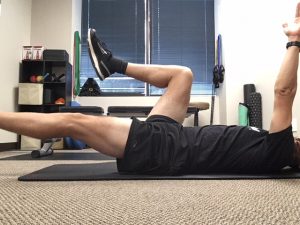
Lay on your back, with your knees and hips bent to 90 degrees and arms held straight in front of shoulder. Brace your core by squeezing back and abdominal muscles. Slowly lower one leg towards the ground, resisting the back from arching up off the ground. Alternate legs keeping a slow pace the entire time. If this version of the dead bug is too difficult, keep the knee bent when moving the leg and perform heel taps. Sets: 3 Reps: 10 per leg

Dead bug improves lumbo-pelvic muscle control important for running               Dead bug improves lumbo-pelvic muscle control important for running

Side plank

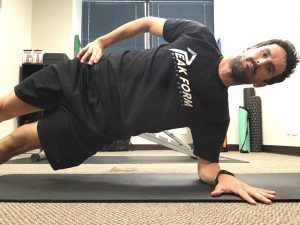
Begin by laying on your side with the elbow tucked underneath the shoulder and feel sacked. Keep the body as straight as possible and lift the pelvis off the ground. Focus on contracting the muscles on the side closest to the floor. Perform the side plank on both sides. Sets: 3 Reps: 1 Hold: 30-60 seconds

Side plank improves lateral core stability which is important for running

Self Myofascial Release to the Gluteal muscles

Take a look at the video below. By using a lacrosse/massage ball into the muscles, muscle tension will decrease which can help with soreness, pain, tightness in the area.

These strategies help with correcting a cross-over gait. If you are experiencing shin, knee, hip, back, or foot pain from running, I highly recommend getting the injury evaluated. A targeted approach to your specific injury can prevent time lost to injury. At our Mission Valley office, we perform Active Release Technique, Graston technique, and rehabilitative exercise to keep our endurance athletes competing pain free!

San Diego Marathon Running

Improve Running Posture

Improve Running Posture

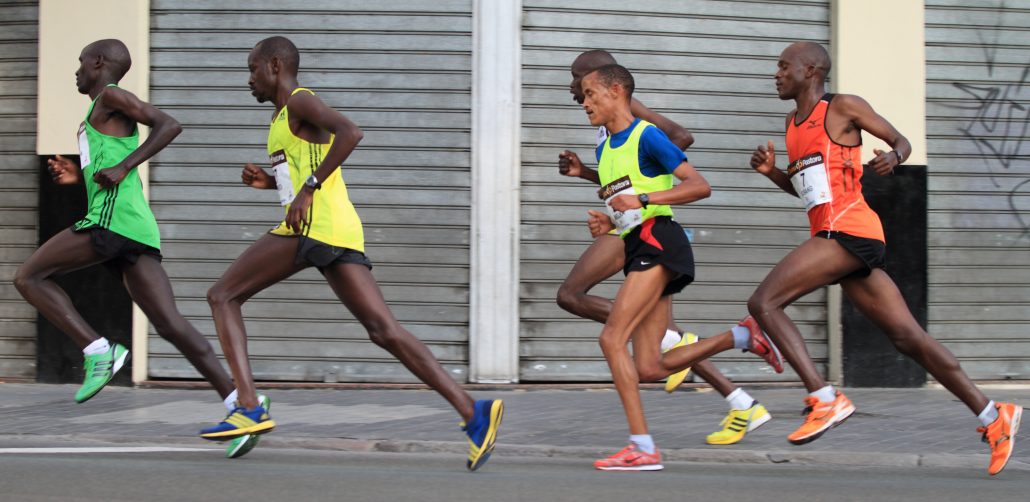
Running posture is essentially how you hold your body while running…simple! When looking at the running posture of elite runners, there are quite a few similarities: they run tall, have a subtle forward lean while they are running, limit their up/down movement, and limit their side to side movement. Let’s take a look at each of these individually. *This post will focus on endurance running as the mechanics/posture change with other running events.*

Running Posture Marathon Running

Run Tall

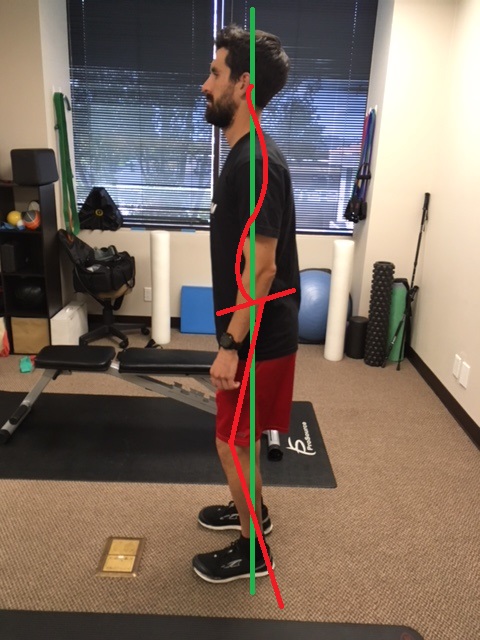
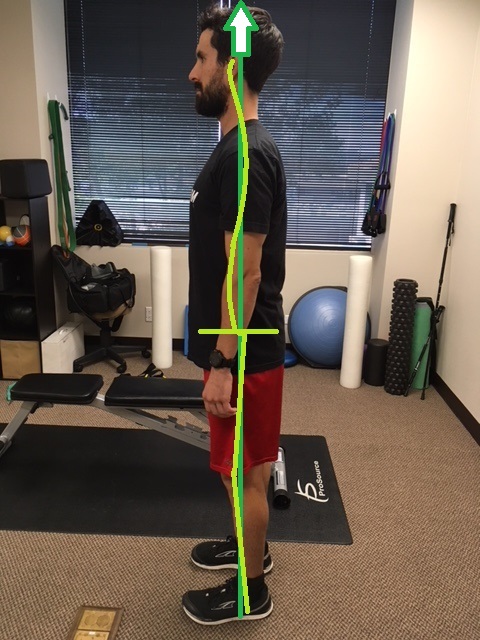
Let’s do a quick test…Stand up and relax your body, looking straight forward. Now, while looking straight forward, think about stretching through your body to each your head towards the ceiling. Another way to think of it is a rope is attached to your head and is pulling your body towards the ceiling. You should feel “taller” and more engaged with your muscles around your spine. This helps activate the spine stabilizing muscles to maintain proper posture: head over shoulders, shoulders over hips, hips over feet.

This spinal stiffness will help us run more efficient and help manage forces traveling through our muscles and joints much easier. In which picture does the runner appear ready to run?


Subtle Lean

Quick test number 2! Stand tall as described above. Now practice moving slightly forward and slightly backward through your ankles; the rest of your body is nice and straight. Good! Now slowly lean forward until you must move one of your legs to “catch” yourself from falling. Practice that a few times. The point where you need to move your leg is roughly where you want to hold yourself while running. This forward lean from the ankles, shifts your center of gravity ever so slightly forward to maintain momentum once you begin running. The faster you run, the more forward lean there is. ********Caution******** Avoid leaning from the waist! When reading about forward lean, runners think “Yea! Lean forward and get my momentum going!”. Leaning from the waist can potentially cause injury particularly at the back, and knees. Don’t do it!

Limit Up and Down Movement

When you think about it, running is a one legged sport; one foot touches the ground, then after a quick transition period of being fully in the air, the other foot touches the ground. This happens very quickly, step after step to keep the body moving forward. What is commonly seen as a runner runs by is a noticeable up and down bounce with their body; this IS a normal movement to an extent but causes issues when it is too great. Two main things frequently occur with beginner and intermediate runners when there is too much up and down movement: 1. There is too long of contact with the foot and the ground allowing the body to “sink” towards the ground due to increased bending at the hip, knee, and ankle, 2. A forceful push off from the toes pushes the body upward and forward.

Ever have extremely sore quads or calves (or both!) following a race? Soreness that lasts days? I have! Why are the legs so sore? When the leg is in contact with the ground for a longer time, the ankle, knee, and hip bend more while the muscles are contracting. This produces eccentric loading to the muscles (muscles lengthen while contracting) which causes the greatest amount of muscle damage. When does this occur? Late in races when our posture deteriorates, and our cadence slows down. Then we try to keep the pace up and muscle through the rest of the run with a slow cadence, resulting in a more forceful push off with our toes… now our calves hurt! Proper posture and a high cadence will help avoid this sequence from occurring or significantly limit the effects.


Limit Side to Side Movement

When running forward, we want our foot to land closer to our body, and under our hips. Similar to above, if there is too much contact time due to a slow cadence, the hip of the swing leg will drop. Now with the hip dropped down, the leg swings forward more towards mid line and then the foot lands, it is now mid line or has crossed over mid line, referred to as a “cross-over running gait” or “tight rope running”. This is the runner you see bounding side to side down the boardwalk. Do you do it? Ever hit your lower leg with your shoe, or see scuff marks on your calf after you run? Those are signs of hip drop; it changes the angle for your leg to move through and literally hits your stance leg. Read more about cross-over gait at our blog here.

Too much side to side movement will decrease your efficiency and set you up for potential injury. If your leg is crossing mid line, the inner muscles/tendons/foot are strained more; recurring posterior shin splints is a common ailment with this gait. There should be a small space between where your feet contact the ground. A strong runner may hide this for shorter runs but as fatigue sets in for longer runs, this will become more and more noticeable. Strength training, running more frequently, and specific drills will help avoid this.


Still with me? That wraps up running posture. Performing the following drills can help improve your running posture and prevent it from breaking down during long runs and races. Schedule with us at Peak Form Health Center to tailor specific exercises to your needs! We are conveniently located in Mission Valley, San Diego!

Tech

Lumo Run- At our Mission Valley office, we encourage our patients to purchase Lumo Run by Lumo tech. It is a wearable device that gives instant feedback (and post run feedback) on many running variables including all the posture points discussed above. Go to the lumobodytech website using this link Lumorun for $10 off! Check out our blog late April 2018 for a full Lumo Run review!

Drills

Posture and Lean

Walk with a Purpose– Stand tall as described above. With each step, push your leg back by squeezing your butt muscles. Continue reaching your head towards the ceiling while doing so. Most of the movement should come from the hip, not the lower back or by pushing off from the foot. Start by working on this before runs 1 minute at a time, but eventually incorporate into your normal walking!

Subtle lean– Stand tall. Rock back and forth from your ankles. 10 forward to help build awareness to where you should be leaning from.

Lean and step– Stand tall. Slowly lean forward until you have to take a step to “catch” yourself from falling forward. Helps work on maintaining a forward lean and proper timing of the first step. 10 steps each leg, three times through.

Band around waist- Anchor an elastic band around a fence, pole, tree, etc. and then place the band around the front of your hips. Walk until you feel the band start gently pulling you back. Now stand tall, keep your body inline and lean forward through your ankles against the band resistance. Move forward and backward to get a feel for a proper lean. Also, once you are leaning into the band, hold that position while taking slow steps in place.

Excessive Bounce

Up and down visualization– Run on a treadmill. Think about a water line right below your mouth; you have to stand tall to and avoid bouncing to avoid falling below that line or else you will be breathing in water. Alternatively, There is a low ceiling right above your head. You must keep your head still or else you will bang your head (Personally do not like this one as much because it does not reinforce elongating your spine/standing tall.)

Cadence– See our blog on cadence here. There are drills in detail there. The purpose is to increase cadence to decrease the amount of time your foot is on the ground so it does not “sink” down resulting in excessive up and down motion.

Cross over gait

Track line– Run around a track with lane lines (bicycle lane line on the road or other lines with similar width work). Run so the line is right in the middle of your body. Your INNER right foot should hit the right border of the line; your INNER left foot should hit the left border. This will force you to run with a wider stance to avoid side to side movement. Occasionally look down to see where your feet are or run with a partner running behind you to give you feedback.

5 Ways to Strengthen Weak Ankles and Prevent Ankle Injuries

Prevent Ankle Injuries: 5 Ways to Prevent Ankle Injuries

5 Ways to Prevent Ankle Injuries

Ankle injuries are one of the most common injuries among athletes. While it is impossible to completely prevent ankle injuries, taking precautionary measures before exercising can help limit the risks. Listed below are stretches to help strengthen and loosen up the muscles around the ankles. These exercises are great for both preventing injuries from happening and helping you recover from an existing injury:

  1. Peroneal Stretches

    One of the most important muscles to strengthen during any recovery or prevention of an ankle sprain is the peroneal muscle. These muscles extend from the top of the knee all the way down to where they attach at the bottom of the foot.

    The exercise is easy: Gently roll onto the outside of your feet and walk around for 60 seconds. This helps strengthen your ankle muscles and gives them additional flexibility.

  2. Ankle Circles

    This simple exercise will help strengthen the muscles in and around the ankle, improving the joints stability. You can either sit on a chair or stand for this conditioning.

    Extend your leg straight out, without bending the knee. Rotate your foot clockwise 10 to 20 times, rest leg for 5 seconds, and raise it again to rotate counterclockwise 10 to 20 times. Alternate legs and do 3 or 4 sets per side.

  3. Dorsiflexion Stretches

    The Dorsiflexion stretch is crucial amongst runners. This stretch is responsible for strengthening the muscles that run along the shin of the leg, called the Anterior Tibialis. This muscle is what controls the up and down movements of the toes. Therefore, strengthening this muscle will not only help prevent shin splints, but can also help protect the muscles and tendons in the ankle.

    First, sit on the floor with your right leg straight out and the left leg crossed, with the sole of your left foot resting against the inside of your right leg. Place a towel or band around the ball of the right foot and gently pull your toes back toward you. Hold for 15 seconds, repeat the stretch 4 times, and then switch legs.

  4. Write the Alphabet

    This exercise is as easy as reciting the alphabet! All you are doing is tracing every letter of the alphabet with your big toe. This exercise is best if you are seated in a chair.

    Hold your right leg straight out in front. Using your big toe as the “pen”, first write each letter of the alphabet in all capital letters. The same process again with lower case letters, then switch feet and repeat. Writing the alphabet is a challenging exercise that will help strengthen both of your ankles!

  5. Achilles Stretches

    Rupturing the Achilles tendon can set you back for quite a while. By doing regular Achilles stretches, you can help limit the risk of rupturing the tendon and help improve flexibility.

    From a standing position, bend the knee of your left leg at a 45 degree angle. Step the right leg back and keep it straight. Ground the heel of your right foot and push the hips forward. Hold this position for 15 to 30 seconds and then switch legs, repeating 2 to 4 sets on each leg.

Athletes at Risk

At our Mission Valley Office, we see many athletes with injured ankles including: ballet dancers, MMA fighters, soccer players, baseball players, and foot ball players. It is important to perform the above mentioned exercises to help prevent ankle injuries. If you are currently experiencing an injury to the ankle, please schedule with our certified sports chiropractors today!